


- Holistic planning from concept to implementation
- Personal. Direct. Reliable
- Ideas & innovative solutions with experience & passion
90° corner connector for LIGHTBOX PRO 2go
90° corner connector for LIGHTBOX PRO 2go
Regular price
20,59€
Regular price
Sale price
20,59€
(including
Shipping)
Couldn't load pickup availability
 Free shipping on orders over €50 (Germany) / €150 (international)
- Secure Delivery:3 - 8 working days
- Quality from Germany – for over 25 years
 Leafroomfungus:
Book for free
Personal Consultation & Planning
Description
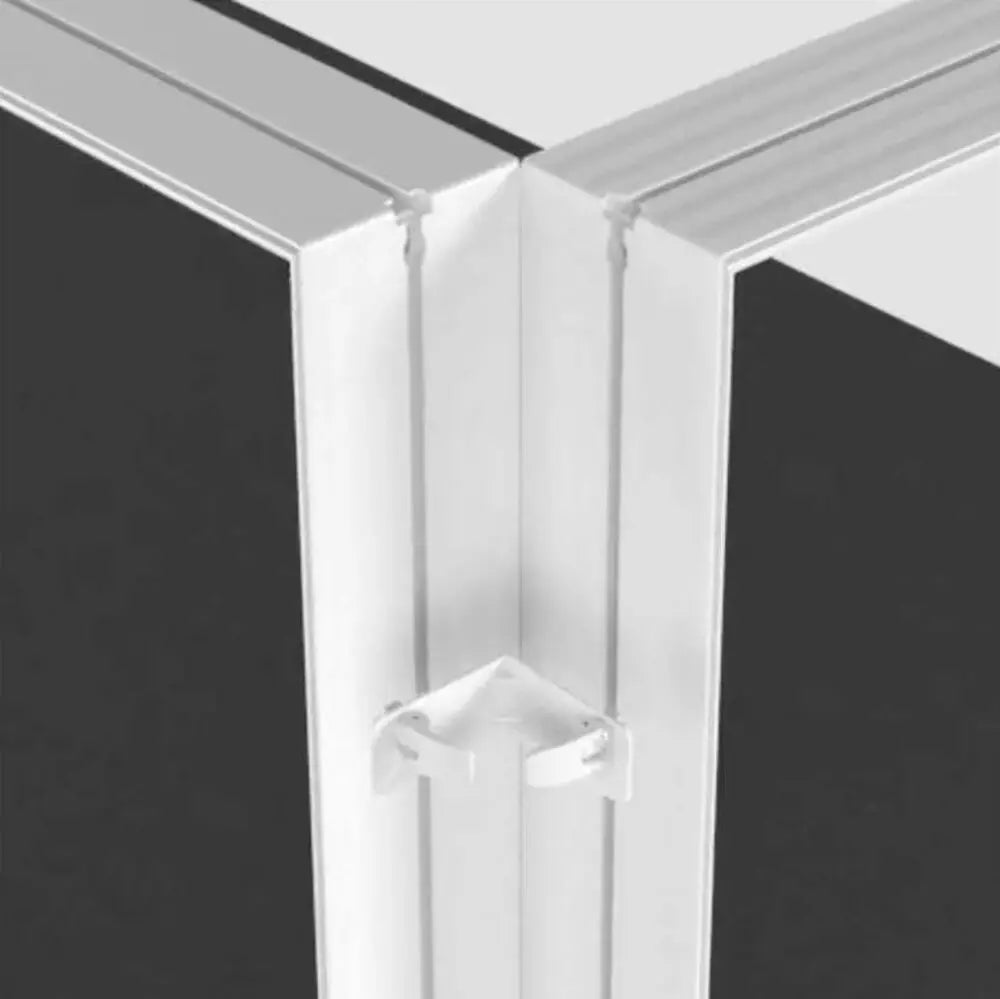
90° corner connector for LIGHTBOX PRO 2go – modular extension for professional trade fair concepts
The 90° corner connector for LIGHTBOX PRO 2go was specially developed to neatly and stably connect multiple LIGHTBOX PRO 2go exhibition walls at corners. This allows for the creation of individual stand concepts with a professional look and high flexibility.
The 90° corner connector allows for the quick expansion of modular LED exhibition walls and their adaptation to different surfaces and stand designs. For optimal stability, it is recommended to mount one 90° corner connector at the top and bottom of each connection point on the back side.
Product advantages at a glance
- Suitable for LIGHTBOX PRO 2go exhibition walls
- Secure 90° connection of multiple modules
- Flexible expansion of exhibition stands
- Ideal for modular stand concepts
- Easy and quick assembly
- Lightweight and practical plastic design
- Clean corner solution for professional presentation areas
General technical data of the 90° corner connector
- Design: 90° corner connector made of plastic
- Suitable for: Connecting LIGHTBOX PRO 2go exhibition walls
- Packaging unit: 2 pieces
- Weight per set: 0.8 kg
Construction of the 90° corner connector
The 90° corner connector is used at the designated connection points between the LIGHTBOX PRO 2go modules and securely joins the exhibition walls together. The corner connection creates stable structures with a clean transition between the individual elements.
For greater stability, it is recommended to mount them in the upper and lower areas of the back.
areas of application
Modular exhibition stands
Ideal for connecting multiple LIGHTBOX PRO 2go systems to create individual corner solutions.
LED exhibition walls
Suitable for professional presentation areas with a 90° setup.
Promotion & Events
Perfect for flexibly expandable brand identities.
Showrooms & presentation areas
Ideal for modular room concepts with a high-quality effect.
Conclusion
The 90° corner connector for LIGHTBOX PRO 2go is the ideal solution for securely connecting multiple exhibition walls at right angles. Its simple assembly and flexible expandability allow for the creation of professional and modular presentation areas for trade fairs, events, and showrooms.
Individual request
Your individual inquiry to Primex
You would like to order a custom format or have a project.
As a manufacturer, we produce custom-made products for you!
We are happy to advise you on your projects and implement individual inquiries.
Print data
Print data & data check:
Please create your designs directly in the desired final format. For instructions on how to correctly prepare your print data, please refer to our data sheet.
Here's how to properly prepare your print data: Primex Print data.
We will of course carefully check your print data.
Should the resolution be insufficient for the desired print, we will contact you immediately to discuss the next steps together.
Assembly
Assembly & Construction
Our products are either delivered pre-assembled or are designed for easy and efficient assembly. Depending on the system, delivery is either as a finished unit or as a well-designed modular system that, in many cases, can be assembled without tools or with minimal tools.
For safe and smooth installation, we provide you with comprehensive functional descriptions, detailed assembly instructions, and, for selected systems, supplementary assembly videos. This allows for step-by-step assembly, even without specialized knowledge.
Why not visit our YouTube Channel with many useful assembly videos.
Professional installation service (optional)
Upon request, we can handle the entire installation for you. To ensure optimal on-site planning, please complete our installation checklist and send it to us. Based on this information, we will create a customized and binding quote for the project.
We draw on an experienced pool of professional installers – particularly in the DACH region and in selected other European countries. Many of our partners already have extensive experience with our systems, ensuring reliable, clean, and on-time implementation.
Formulate:
Thank you for your trust. If you have any questions regarding assembly, planning, or implementation, our team is always happy to advise you.
Downloads
Downloads & Product Data Sheets
Care instructions
Cleaning and care recommendations for frames
- Only use soft, non-abrasive cloths or rags.
- Important: The surfaces to be cleaned should be cleaned as gently as possible and then rinsed thoroughly with water, as residues of salts, acids or alkalis can cause corrosion.
- Rubbing can lead to the coating becoming dull.
- Powder-coated parts should only be stored dry.
- Standard pH-neutral household cleaning agents are suitable.
- Never use solvent-containing products, alcohols, thinners (e.g. nitro thinner), acetic acid or other acids.
- Under no circumstances use abrasive or scratching cleaning agents.
Care instructions for display textile prints "without LED"
- Washable at 30° (easy care), liquid color detergent, gentle spin cycle (max. 800 rpm)
- Ironing: On the reverse side at level 1 – 2
- Tumble dryer suitable (cold/lukewarm) Alternatively: Air dry spread out over a large area
- Store on suitable cardboard rolls or loosely folded in a box (Caution! Absolutely avoid creases)
- Store not below 10°C+ and not above 60°C+ at constant temperature
Care instructions for display textile prints with grey, white or black separating layer "Blockout"
- Not washable
- Do not iron
- Store on suitable cardboard rolls or loosely folded in a box (Caution! Absolutely avoid creases)
- Store not below 10°C+ and not above 60°C+ at constant temperature
Care instructions for backlit textile prints "with LED"
- Not washable
- Do not iron
- Store on suitable cardboard rolls or loosely folded in a box (Caution! Absolutely avoid creases)
- Store not below 10°C+ and not above 60°C+ at constant temperature
Care instructions for PVC tarpaulin prints
- Not washable
- Do not iron
- Store on suitable cardboard rolls or loosely folded in a box (Caution! Absolutely avoid creases)
- Store not below 10°C+ and not above 60°C+ at constant temperature
Disclaimer for care and cleaning recommendations
The care and cleaning recommendations provided by us have been developed and tested in consultation with the respective manufacturers of the raw materials used. Nevertheless, these statements serve exclusively as non-binding information based on our many years of experience.
Due to individual manufacturer tolerances, different cleaning agents, varying machines and deviating application conditions, Primex cannot assume any guarantee or liability for the actual suitability, effect or result of the recommended care and cleaning measures.
Any liability – regardless of the legal reason – is excluded. The responsibility for the selection, application and execution of suitable care and cleaning procedures lies exclusively with the user.
We ask for your understanding and thank you for your trust.
Change of subject
Tool-free motif change - we think ahead!
We love sustainability not only in the raw materials for our acoustic pictures, acoustic partitions, etc., but also think long-term. For this reason, we have opted for a frame system that allows for a motif change without having to replace the entire product. Easily adapt the aluminum frames to the season, design, or color concept. Our textile print is interchangeable thanks to the keder system. You don't even have to take the frame off the wall to change the motif. Changing the motif is child's play and, most importantly, no tools are needed.
How to change the motif:
- Remove the textile. Pull the existing tab forward and the textile will detach from the frame. Now you can carefully pull the textile off along the frame.
- Insert the new textile. You can watch our short video for this.
Reorder textile printing